Monday, June 11, 2012

Zvezda Set 8048 Swedish Infantry

Like I said last time. I am now basing my miniatures a different way. I think they look a lot better this way. Almost as if they are war game ready. This is one of my best sets painted so far. These are painted to look like the figures painted on the box they came with. This is the uniform from 1687-1721.


Till next time.


Sunday, May 6, 2012

DAD'S CAR

This post is a little off topic. A change once in a while is also good. My dad called me last week and  asked me if I could paint a toy car for him. My dad owns a Sunbeam Tiger and had bought a toy replica of it for his show case. The only problem was, it did not look like the one he had in his garage.  So I excepted the challenge. I thought at first this was going to be an easy project. Why not? Painting miniatures is easy enough, why not this. WELL let me tell you. This was a pain in the ass. I will explain as I show the pictures in the rest of the blog. First I will start with the pictures that me dad sent of his car.


I think this is a cool car!!! So next is the toy Sunbeam car.  This is the toy....


OK now comes the fun part. I had some things I needed to add to it. As you can see there is a lot missing. The first thing that I had to do was switch the steering wheel from the right side to the left side. That was easy. Next I had t make the roll bars. For the roll bars I used a green paper clip that was just the right thickness. I has to cut and glue it. After the roll bars I made the gear shifter. For this I used one of my wife's needles with  a plastic ball at the end of it. I melted the plastic ball with a lighter. This way I could get the size I wanted. After the gear shifter I had to make tail pipes. For this I had to drill two holes at the back of the car. I then stuck to sized toothpicks in the holes. After the pipes I had to make the side view mirrors. I hand carved these out of wood and glued them to the car. This is what the car looked like after the modifications. Oh yes I almost forgot. I added the hood scope as well. That was the first thing I did.


So next It was time to paint it. The easy part right? Noooooooooooo!!!! It all started from the priming. I guess the primer and the original paint on the toy car didn't work well together because as soon as I stop the priming the paint started to bubble. This caused me problems the rest of the way. After tyring to fix what I could with the paint by sanding and filling I started to paint the car. Of course with my luck the paint did not want to spread even on the car because of the primer. I did the best I could. I still got good results considering the facts. This is what it looks like now that it is finished.


I hope you like you car dad.

Tuesday, April 17, 2012

ITALERI Set 6019 Teutonic Knights

Just like a promised, a different Era. This set was fun to paint. This will be the last post you will see with the miniatures on these types of bases. I have been using 25mm X 25mm for Infantry and 25mm X 50mm for the cavalry. After Basing these cavalry with the 25mm X 50mm base I decided that I did not like the size. They are good for single Dioramas or war hammer figures and 28mm figures. Since I paint 1/72 scale miniatures I think 20x20mm bases suit the figures better. I have also decided that the bases should not have the bevel on the sides. This will be better for war gaming. You will see how I base my miniatures in the next post to come.
This was my first Middle Ages set. I picked the Teutonic Knights because they look a little more evil. The black on white makes them stand out. Italeri did a great job sculpting these figures. This made painting the faces so much better. I was able to get more detail out of them. This is what they look like before I painted them.

This set came with 17 mounted miniatures. I did enjoy painting the horses and can't wait to paint more. This is what the set looks like once I painted them.


As you can see I have tried something different when it comes to taking pictures of my miniatures. I think this way looks better. Well that's it for this post. Any questions feel free to ask. Looking forward to the nest post.

Monday, March 19, 2012

ZVEZDA 8034 Republican Roman Infantry

The Romans are here!!! The next chapter in my blog. Or should I say the next set in my collection? I guess ether or. This set was fun to paint. Zvezda has great quality molds. This makes it more easy to paint the miniatures. When you come across a set that has been produced with bad molds, you have to use your imagination to make them look proper. I painted this set a while ago. I just finished re basing them yesterday. Some of you might look at the uniforms that the miniatures are waring and disagree with my colouring. In fact it was hard in those days to have all soldiers waring the same thing. Most soldiers had to find cloth them selves to make there own uniform. These units were painted after one of my favorite PC games. "ROME TOTAL WAR" For those of you who know the Total War series, you know that Total war games are the best!!! Anyways. On the front cover of the game it shows the insignia of the Romans with black on red. I have used that for this set. It is not the Yellow/Gold on red shields that we are used to seeing. I'm sure a set of those will come in the future. As for now this is what I have brought to the table of my miniature wars!! Below is what the set looked like before it was painted.
I agree with you. It's a nice looking set!! This set just makes me want to paint more Romans. Take a look at them once I painted them.

Well I hope that you all have enjoyed this post. Remember that you comments are always welcome. Don't be afraid to criticize as well!! Next post I step into a different era. Till then.

Sunday, February 26, 2012

Zvezda Set 8005 V-IV Century Greek Infantry

It's about time. This was the Set that I wanted to post last time. I thought that this post would end up in March. I'm glad that I was wrong. I had a lot of fun painting this set. Although my Infantry colors do not match the Shields of the soldiers, I still think they came out great. This set is made by Zvezda. The only problem that I had with this set is the fact that each Greek City was molded in the same pose. Greece was separated by different cities back in the V and IV Century. Before and after that period as well. Each City had it's own symbol or Picture representing that city on their shield. This left me with options. Do I paint each city in it's own pose? Or do I disregard the Shields and paint four different cities? Well, because I wanted a larger amount of soldiers per city, I decided to paint four cities. After they were all painted I was pleased in the choice that I made. I will explain were I got the inspiration for each city group as the post continues. As for now, this is what the set looks like before it is painted.
As you can see in this picture. I was stuck with one leader and musician. This meant that I had to dedicated them to only one city group. I think I did well when it came down to segregating the units. Let the pictures begin.

This is the first group that I painted. This group was not painted to represent a city. I actually decided to paint this group after Achilles and his mercenary group in the movie Troy. What a great movie it was!!! I like the way these turned out with gold on black. On to the next Group.

This City group is cool as well. I painted these to represent more common Greek cities. As far as I know, (most likely due to the fact that the majority of the figures on the back of box set are painted like this) This is what the majority of the Greek soldiers wore when it came to colors. So there really is not a city for this group but rather a reflection of common military. On to the next one.
I painted this group after another movie. I can not remember the name of the movie. I thought it had Arnold Schwarzenegger in it. I guess not because I just searched IMDb's web site for his movies and it was not there. When I find out , I will post it. I was watching the movie while I was painting another set. I thought it would be cool to paint this set like the soldiers in the movie. They had light blue uniforms like this. If anyone know what movie I'm talking about please let me know.

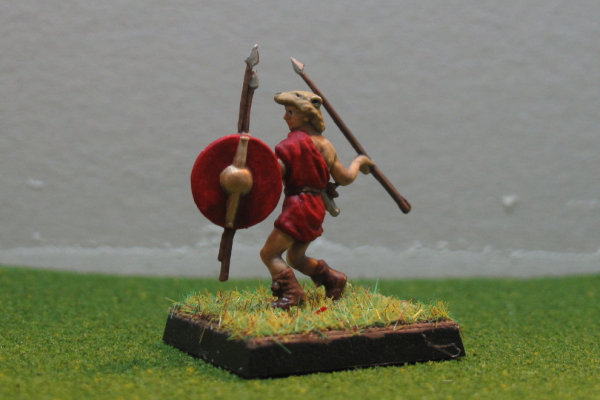
This  is the group that I decided to use the leader and the musician with. These guy's are painted after the Spartans. These guy's were famous for there military strength and brutality. This group was by far my favorite one to paint. Yes I got the inspiration from the movie 300. Looks like all four cities were painted after movies. Probable not the best idea. Here are some single shots to finish the post off.

Well that wraps up this post. Please leave comment if you have them. Next post will be in the same Era!!! Until then.